Online Storage Uses in 2014

So what can online storage and online backup really be used for? Well, that is a good question to ask. Most people, home users that is, tend to use it to keep data they have a lot of. More often than not this includes photos, videos, music and unused data off their home computers. In terms of professional users, it's not uncommon for major corporations to store their whole network of data via cloud storage as it's a lot more secure and cost effective than a local, offline solution. There is also the added bonus of being able to view the stored files from any place at any time which is a god send for businesses who wish to keep their data accessible and secure. Home users tend to be less concerned about safety and file security but still, if it's available then why not be secure - after all, the price is the same whichever way you go.

When it comes to cloud storage, mobile phone users also make up a large chunk of the users or audience. Mobile phones these days tend to be able to hold a hell of a lot of data but in the end, this gets full up. Phones tend to hold important photos and music, the sort of things you don't want to lose so this is where online storage comes in. Most of the major online storage companies offer a mobile app which will let you literally grab files from your device and send the data up to the cloud. On top of that, you can also keep your phone permanently sync'd with the backup program so any file you create on your phone can automatically be sent up. This is a great way to save storage and also make your files available on demand and at any time. That's what we need right?

Anyway. why should you fork out for cloud storage solutions when there are so many free to use systems out there? Well, if you think a free provider will work for your needs then go ahead, use a free one. But the saying, you get what you pay for really holds true when it comes to data backup. With that said though, lots of the storage providers offer try before you buy so you can see if the software will be right for you before you part with hard earned money. Free services tend to work most of the time, but if you're talking about uploading files that are important to you or even storing business data then you need to get your wallet out and pay for something reliable. Free cloud backup have their place but given the price of cloud storage in general is quite cheap in the scheme of things then you may as well just go premium.

WordPress Automatic Internal Link Building Plugins For On Page SEO

WordPress Automatic Internal Link Building or Internal Link Building is a very effective factor for your On Page SEO and if it is done properly, it can boost your website ranking in SERP’s. Users who are not aware of Internal Link building should know that Internal Link building is the backbone of on page SEO. Manually doing WordPress Internal Link Building is a time taking process and can take your much time and if you have a very big blog or website, then it can take from months to years, so instead of doing it manually, I recommend WordPress Automatic Internal Link Building with the help of some WordPress Plugins. All these plugins will help you in Automatic Internal Link Building in just a few seconds with the help of just few clicks. You can even use these plugins for your old blogs on which you have never cared for the WordPress Internal Link Building, and it will definitely boost your blog / website ranking in the Search Engines.

Related Posts Thumbnails:

“Related Posts Thumbnails” is a simple to use, effective and a very useful plugin for the sake of WordPress Automatic Internal Link Building. This plugin basically will show the related posts, with thumbnail images at the bottom of your each post. You can choose the criteria for showing the related posts on the basis of your category, tags, categories and tags, custom criteria etc. It decreases the bounce rate on your blog / website by showing them more related content about their interest. And if done correctly, it can help you boost your website SERPs in search engines. So, to overcome the poor internal linking structure on your blog, you can install this plug and give it a try.

SEO Ultimate:

“SEO Ultimate” is another of the best plugins for the WordPress On-Page SEO and WordPress Automatic Internal Link Building.  It is famous for its one of the most useful and interesting feature called “Deeplink Juggernaut”.  People love this plugin because it allows you to make Internal Links across your website with much ease. You have to define some keywords, links and some other settings, rest whole work will be done by the plugin itself. It will automatically replace your keywords with the links that you have configured on each post and page of your website.

SEOPressor:

“SEOPressor” is a premium plugin for WordPress Automatic Internal Link Building. Many WordPress users believe it as of the most powerful, useful plugin for the WordPress Automatic Internal Link Building. Just like SEO Ultimate, it also comes with WordPress Automatic Internal Link Building feature. You just have to define your keywords, links linking to them, the rest work of internal link building is done by this plugin itself automatically on your entire website posts and pages.
So, these are the top 3 WordPress Automatic Internal Link Building Plugins through which you can do automatic internal link building across your website. These plugins will definitely boost your SERPs. Give them a try. Have any questions to ask, you can comment below. Every one’s question will be answered.

How To Find Lost Windows 8.1 Product Key

Some times it happens that you accidentally lost your Windows 8, Windows 8.1 product key, and its hard to find that by searching all your emails. Many times the sticker that contains the Windows 8.1 product key may get removed accidentally. Now question, arises How To Find Lost Windows 8.1 Product Key? Lets suppose you have a laptop having windows 8.1 installed in it and you want to purchase some new laptop but wants to use the same old licensed windows 8.1 and you are unable to find the key, what will you do? So here is a guide to resolve this issue.
Step 1 : You need to download Windows 8.1 product key viewer. It is a very light weight application.
Step 2: Run this on your pc, simply unzip the zip folder and open the .exe file “pkeyui.exe”. And hit the run button.
Step 3 : Note down your Windows 8 or 8.1 product key from this window. It will be 25 characters product key. Copy and note down this key in some save place.
Find Lost Windows 8.1 Product Key
That’s it. You have Find Lost Windows 8.1 Product Key for your PC. Now you can use it on some other pc if incase you need to resintall your windows on some other pc.

How to Get your Facebook Page Verified Walkthrough

Facebook has introduced a new feature recently for facebook profiles and pages that are official and gives them badge beside their page name. That badge indicates that the page is official and authentic and facebook has verified that. It also means that facebook has verified that business or individual by different verification methods and have reached to conclusion that particular page or profile is really genuine and not fake.
Benefit of Verified Page or Profile :
  •  It makes it easier for people to find that page.
  •  It gives the pages a lot of organic reach.
  •  It boosts the page’s post reach to maximum no. of audience.
We as a normal user creates our account at facebook, and its quitely possible that another person with the same name have also created an account at facebook. The question arises how can we distinguish the Businesses and high profile people profiles ?
Let suppose i have created a page called “Love Quotes”, now there will be thousand of pages of this name or celebrity profiles etc. So facebook took serious step to verify that which individual one is official and which one is fake.
How to Get your Facebook Page Verified:
Verified pages will have the little tick mark badge beside their page name . That will be of blue color as shown below. So you can easily find whether a facebook page or profile is verified or not.
Which type of Pages or Profiles facebook Verifies :
Facebook verifies only these type of pages of profiles.
  • Celebrities
  • Businesses
  • Journalists
  • Public Figurues
  • Govt. Officials
  • Popular Brands
These are the only categories that can be verified by facebook. Some times if you have local business, facebook automatically verifies that page by seeing that you are official representative of that facebook business or page . And there is no need to verifiy that page at all manually and sending request to facebook. Facebook in that case will verify your page or profile depending on some particular details and requirements that are decided by facebook .
How can I Verify my Facebook Page :
If you are owner of some page or profile and it fulfils all the requirements as mentioned above. Then there are chances that you can get your page verified . Basically, facebook does not have any contact form to claim any page verified. This is infact completely automatic process. Therefore to get your page or profile verified , you should make some changes in your page or profile.
To claim your facebook page, your page or profile must have minimum details to get it verified. These are the two steps that are mentioned by facebook to get our page or profile verified.
  • You should link your website from our page and our page too from your website.
  • You should provide accurate information details in about section of your page or profile.
Also you should add long and short description , your business keyword, your official email, website and location of the verified page that which claims the address of your page in the page info tab.
For more details visit help center here for Profile or Page About info.
These are the steps that you can follow to get your page or profile verified that is official. But again repeating
“Facebook does not guaranteed about all the pages to be verified because it also depends on the popularity factor of your business too. ”
Therefore you can add all this information in the about tab and page info tab of your page and wait for about 45-50 days after filling that information. 45-50 days period works for me when i am working with my clients to get verified their popular official business pages.
I hope so i have covered all the queries related to verified facebook pages, if you still have any query feel free to ask.

SEO Search Query Operators For Google You Must Know

These are the SEO Search Query Operators For Google You Must Know and they can help you determine your competitive ranking progress in your SEO campaign. You can filter search results by using these SEO Search Query Operators For Google.


site:

Site is one of  the top Query operator from SEO Search Query Operators. This command will tells you all the web pages in your specific site that Google has found. This command should always be followed by your website in this format.site:techleaks.us“. You can also combine this command with keywords, this will help you find specific pages having those keywords in it from that domain.  For example “site:www.example.com Hair Styles” will return all the web pages from that domain having hair styles keyword in them. This command is useful in those cases when you want to find the issues of cannibalization. Because it can tell you whether a same site is referencing the same keyword on multiple pages or not.

allintitle:

It is one from the top Search Query Operators used by SEO Experts.By starting your query with allintitle: Google will show only those search results that have your words in their title. For example, allintitle:red shoes will return you all the webpages that have red and shoes in their title. Note use the command without the quotes.

allintext:

This comes after the allintitle Search Query Operators. If you start your query with the allintext: Google will show only those search results that have your words in the text content of the page. For example, allintext:red shoes shop will return only pages in which the words “red,” “shoes” and “shop” appear in the text of the page.

allinurl:

This operator is ranked after the allintext Search Query Operators .If you start your query with the allinurl: Google will show only those search results that have your words in the url of the page. For example, allinurl:red shoes will return only documents that contain the words “red” and “shoes” in the URL.

allinanchor:

It is backbone of  Search Query Operators. When you start your query with allinanchor: Google will only show results to pages containing all query terms you entered in the anchor text  links to the page. For example, allinanchor:shoes shop will return only pages in which the anchor text on links to the pages contain the words “shoes” and “shop”.

cache:

Cache is also a very important operator that comes in the list of Search Query Operators. This query cache:url will display Google cached version of a web page, instead of the current version of the page. For example,  cache:www.techleaks.us will show Google cached version of the TechLeaks home page.Note: Do not put a space between cache: and the URL (web address).

inanchor:

When you include inanchor: in your Google query, Google will show the results to pages containing the query world you specified in the anchor text or links to the page. For example, shoes inanchor:red will return pages in which the anchor text on links to the pages contain the word “red” and the page contains the word “shoes.”

intext:

It is a alternative version of allintext Search Query Operators. When you use the query intext, intext:keyword restricts results to all documents that are containing keyword in the text. For instance, red shoes intext:shop will return documents that mention the word “shop” in the text, and mention the names “red” and “shoes” anywhere in the document (text or not). Note: There must be no space between the intext: and the following word. Here note one thing that writing intext: in front of every keyword in your query is equivalent to putting allintext: at the front of your query, e.g., intext:red intext:shoes is the same as allintext: red shoes .

intitle:

It is the alternative version of allintitle  Search Query Operators. When you start query with intitle, intitle:keyword  will show only those results containing keyword in the title of that page. For example, red shoes intitle:shop will return documents that mention the word “shop” in their titles, and mention the words “red” and “shoes” anywhere in the document.Note: There must be no space between the intitle: and the following word.Note here that writing intitle: in front of every word in your query is just same as to putting allintitle: at the start of your query, e.g., intitle:red intitle:shoes is the same as allintitle: red shoes.

inurl:

It is also alternative version of allinurl Search Query Operators When you write inurl: in your query, Google will show only the results to documents containing that word in the url. For exampe, inurl:shoes site:www.ebay.com searches for pages on ebay in which the URL contains the word “shop”. Note: There must be no space between the inurl: and the following keyword. Here note one thing that writing inurl: in front of every word in your query is same as to putting allinurl: at the start of your query, e.g., inurl:red inurl:shoes  is the same as  allinurl: red shoes .

Recommended WordPress SEO Yoast Settings

WordPress SEO Yoast is no doubt the overall best SEO plugin for the SEO in market. This plugin allows you to do brilliant basic on-page SEO on your each blog posts and pages with ease. For the beginners, who don’t have good understanding of this plugin, this guide will help you in setting up this plugin on your blog. I will guide you here Recommended WordPress SEO Yoast Settings which will ensure you to have perfect on-page SEO on your blog to boosts your blog’s ranking in SERPs.

Recommended WordPress SEO Yoast Settings

To ensure the perfect on-page SEO on your blog, here are the Recommended WordPress SEO Yoast Settings. After completing these Recommended WordPress SEO Yoast Settings, your blog will be perfectly search engine friendly from the on-page SEO perspective. You will need to go to Titles and Metas section of the WordPress SEO Yoast and then choose these settings. First of all you need to customize the General Settings for the WordPress SEO Yoast. First we will prevent the search engines from picking your blog description and other settings from the MOZ and Yahoo directories. You need to do this so that search engine can show and pick only those descriptions that you have written in your blog. Also you need to Clean up the head to remove the unwanted tags from the head section of your blog. Click on Save Settings now.
Recommended WordPress SEO Yoast Settings (1)
Disable Indexing of Categories and Tags: In this step we are going to disable the indexing of tags and categories. Because it is important to prevent search engines to index these things to avoid the issue of duplicate content that can lower the ranking of your blog. To do this, go to Taxonomies tab and check the boxes of noindex, nofollow under the categories and tags section. Then click on Save Settings.
Recommended WordPress SEO Yoast Settings (6)
Disable Author Archives: When author archive is enabled, your content gets indexed two times, once under the post url and secondly under the archive url which can cause the duplicate content issues so you should disable this option for your all posts author.
Recommended WordPress SEO Yoast Settings 76
These were the Recommended WordPress SEO Yoast Settings for the on-page SEO. There are some settings more that you can explore yourself. I hope so that you have understood the Recommended WordPress SEO Yoast Settings for your perfect on-page SEO. If you have any difficulty configuring it or face any other issue, then you can ask here in the comments. It will be my pleasure to answer you.

Some common Command prompt Commands that every one should know!

Some common Command prompt Commands that every one should know!

Command prompt is a very common thing in windows . We can run many things and give commands to our computer with using command prompt.
Today i am going to discus about some common command prompt commands which we can use in our daily life
Also read: How to download torrent with idm
  • Go to your start button and search command prompt and open it.
  • Now put first command "whoami" (without commas) it will gave your computer name.
    Command prompt Commands
  • Another useful command is "systeminfo" it'll gave you each and every information about your PCCommand prompt Commands
  •  
  • Put "tasklist" it'll give you information about all running tasks.
    Command prompt Commands
  • Put "ipconfig"  it'll give you information about your IP configuration.
    Command prompt Commands
  • Put "color list" and it opens the color list of your command prompt you can change colors by applying command"color 1"you can add 1 to 9 and then a to f it changes many colors of cmd.
    Command prompt Commands
  • put"ipconfig && netstat" it will gave you internet status.
    Command prompt Commands

Top 10 Media Players of 2014

Top 10 Media Players of 2014
Hello Friends today i have a special collection for you and this collection is the Collection of top 10 media players of the world till 2014 to 2015. Players i am going to share with you are the ever best and unbeatable video players.They are created by the great developers. They have a lot of functions. They are compatible with all windows versions. they can play any type of video format and audio format. They have equalizer that can change the voice at the end they have everything that a media player should have. so here is the list :)

Also Read: How to Control your PC with Android Mobile

1: BS Player

Top 10 Media players of 2014

2: Daum PotPlayer

Top 10 Media Players of 2014

3: DivX Player

Top 10 Media Players of 2014

4: GOM Media PlayerTop 10 Media Players of 2014

5: jetAudio

6: Kantaris
7: KMPlayer
8: Media Player Classic Home Cinema
9: MPCSTAR
10: RealPlayer

Mafia 2 PC Game Free Full Version Download

Mafia 2 PC Game Free Full Version Download

System Requirments

  1. System:Pentium4 2.8 MHz
  2. RAM: 512 MB
  3. Video Memory:256MB
  4. Size;8 gb  MB
  5. OS:Windows 98 or XP or Vista Seven/8

Mafia 2 Game Wallpapers|Mafia 2 Game ScreenShoots|Mafia 2 Game Images


Brando Mini BT Keyboard - Part II

DSC00652

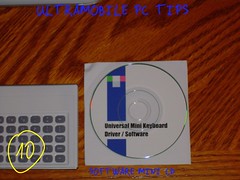
First of all, everything that I'm about to say can be found in the User Manual of this Keyboard that can be downloaded here. So I'm just going to add some comments and screen shots of my own experience installing this keyboard.

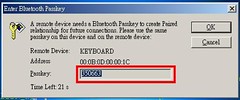
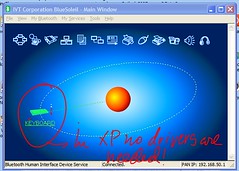
If you are planning to use this keyboard with your UMPC the good news is that you don't have to install anything. you open your BT software, look for a new BT device, pair it, it will ask you to retype a password, you do that in Brando Mini Keyboard and that's it.

Btpass


bt01

Ready to be used!It you want to use your keyboard with another PC, you have to disable the BT IP code by pressing these 3 keys:

IPCode

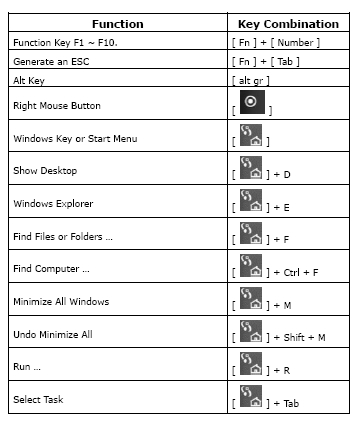
Here are some Standard Windows Short Cuts included in thisKeyboard.

windowsshortcut

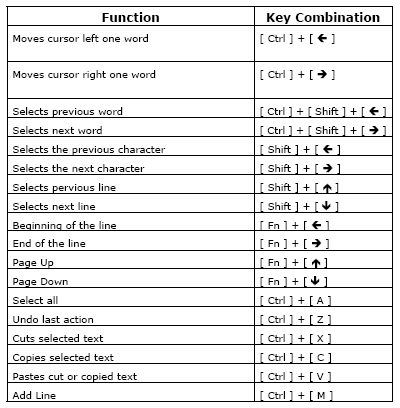
And the following table shows some Editing Short Cuts or Hot Keys:

editing


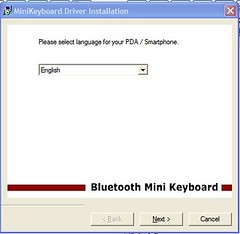
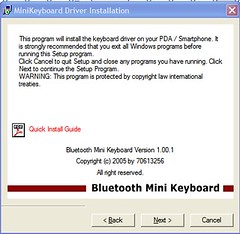
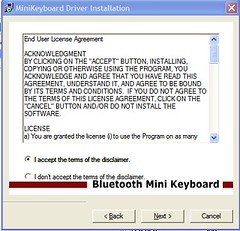
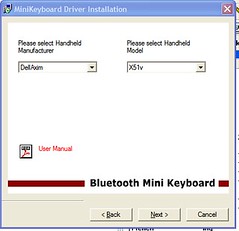
The situation is different when you are planning to use it in your Pocket PC. In this case you need to install the drivers in your Pocket PC so before your run the setup file from Brando's Mini CD, would be good if you connect your Pocket PC to your UMPC.

bt1

bt2

bt3

bt4

In the above screen shot Brando gives you a list of Pocket PCs brands and models and I was happy to find the Axim x51v listed there.

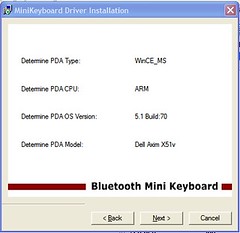
bt5

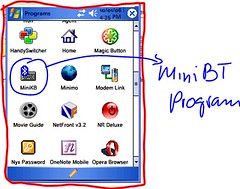
At this point the drivers and program are copied to your PPC. Once the installation is done in your PPC you will find a new icon listed in your Programs Window.

Bt6

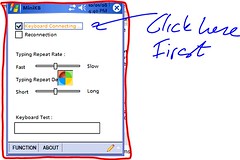
To start using your keyboard all you need to do is run the program...

bt7

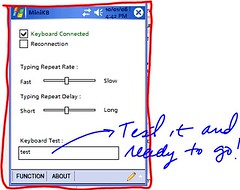
...click the checkbox


bt8

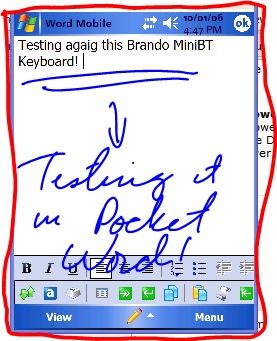
...You test it and you are ready lo use it. Just Minimize this program and open Pocket Word and start using this keyboard to write your documents and emails.

bt9


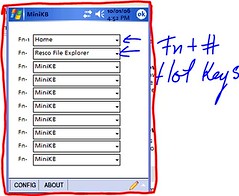
One nice feature is the possibility of assigning tasks such as to open programs to hot keys...


bt9


bt11


Speed Coefficient

What's the Speed Coefficient? If I tell you that I able to type 15 words per minutes using this keyboard that wont mean to much to you. So I thought that would be better if I take that number and divide it by the quantity of Words per Minutes that I normally make with a normal keyboard: 15/55 = 0.27. Now you can use this Speed Coefficient and multiply it by what is your typing speed in a normal Keyboard and the result will tell you how many words per minute approximately you are going to make in this keyboard. So the Speed Coefficient is 0.27


Conclusion

This keyboard is the perfect solution for people that own a Pocket PC and an UMPC. The small size of it make it the perfect companion for Packet PC like the Axim X51v which does not have it own keyboard. It will be faster to type using this keyboard than to use the screen keyboard. When you use this Keyboard with your UMPC you will get probably the same words per minutes than what you get using Dialkey and a little bit faster that if you use the TIP in Keyboard mode. I write faster using Handwriting recognizer than using Dialkey and TIP in keyboard mode so I find this keyboard useful when I'm programming where I use commands and variable names that are not common words.

I would like to thank Brando for providing me with this keyboard to write this review.

CCleaner, a must have

I have been using CCleaner since it was first released more than 10 years ago and still today I consider it a must have application.


One of the options on it that I use a lot is the Registry cleaner.   Every time that I uninstall any software I run this option and every time I end finding a lot of junk left there by the removal process.

Qadabra Ad Network: Get Paid As Soon As You Make $1

qadabra minimum payoutHow many times did you join an ad network and left it without getting any money?
It happened several times with me. When I stared blogging, I tried many advertising networks on my blog. After realizing that those ad networks were not performing well for me, I stopped using those. But I never get any payment as most of the time minimum payment threshold is $50. Because of that I stopped using new Ad networks.
So how about if someone offers you to pay as soon as you make $1? It would be amazing. At least you are getting something for your work. You can quit anytime when you feel that it’s not working for you, obviously with your earnings.
I am talking about Qadabra Ad Network. This is the only program that offers $1 minimum payout. You don’t have to wait a long time to get your first payment. It is considered as one of the best Adsense alternatives. If you don’t get approved by Adsense or Adsense banned your account, try Qadabra.
What is Qadabra? How does it Work?
Qadabra is a self-serve ad platform that offers site owners to make money from their site traffic through performance based advertising. It is developed by Merimidia.
Qadabra Works like other online Advertising network. Once you’ve signed up for Qadabra, it will optimize your site to display the best performing ads on your blog and maximize your eCPM.
Qadabra Vs Adsense
Qadabra is a great Adsense alternative. Where Adsense is very strict on approving new site, Qadabra offers immediate approval. You don’t need have a huge traffic on your blog. You can monetize your new site with Qadabra. Even if you have Adsense on your site, you can use Adsense to increase your revenue. Just make sure you aren’t using both ads alongside.

How to Get Started With Qadabra

It’s very easy.
At first, you’ll have to create an account on Qadabra.
Just go to Qadabra.com and click on ‘Go live in minutes’ button. Then enter your Name, Email, Password and click on ‘Sign up’.
Your account will be approved immediately and you can start showing ads on your blog.
To get started, login your account and go to Dashboard > Placements and click on ‘New Placement’. Then provide your site URL, Name of Placement, Ad type and Add size. And click on ‘Create a New Placement’.
qadabra ads placement
Then copy your ad tag and paste it where you want to show the Ad on your blog. It will start showing ads on your blog within few minutes.
Qadabra Payment Options – How will you get paid?
Qadabra provides payment via Paypal, Payoneer prepaid card and Wire transfer on NET45 terms. You’ll get your payment 45 days after the end of each month. Minimum payouts are -
  • PayPal  $1
  • Payoneer prepaid card  $20
  • Wire transfer  $500
To receive your payments, go to your settings page and select your payment method and fill other necessary information.
What I Like About Qadabra
  • Getting approved by Qadabra is easier than other ad networks.
  • It’s very easy to start. (Just copy and paste the tag on your site)
  • Qadabra’s minimum payment threshold is $1.
  • There is no minimum impression volume.
  • It ensures maximum eCPM with the highest paying advertiser.
  • Easy to use Dashboard.
  • It has a team of experts that offer dedicated 24/7 support.
  • It works with all geographic locations.

Best Method To Create Genuine Adsense Account

Having a Google Adsense account is the most desirable dream of a Publisher,who wants to turns his words into money,who has the possible abilities to transform his blog/website into a machine which not only genrates traffic but also gives him relativity Good revenue.This is the reason why Google Adsense is the most used advertising program with allmost millions of publishers who allows Google to advertise on there website.If you want an easy way to earn money from your online content, AdSense makes sense. Google AdSense shows the right ads on your website, videos, or even web-based games and you make money.

But due to the increase in miss use of Adsense,Google is now turning down almost all the new requests  that it receive from a user who want to be the partner with Google Adsense.They have changed there policies and now these polices are even more strict.So what a new publisher will do who want get good revenue from his website as Adsense was the only one who allows small publisher to earn on large scale.

You don't need to be worried by the end of this post I can guaranty you will be able to register your Adsence account successfully.As this is the genuine method to get your very own Adsence account.

1.Register Your Free Gmail Account:

To get Adsense account you will require Gmail account,without Gmail you cannot register a adsense account.So first thing first
  • Go to www.Gmail.com
  • Select Signup or Register a New Account
  • Now fill your correct personal details
And now your Gmail Account is created now you can apply for Adsense if you have a website which has good traffic,if you don't have a website then you need to create a new website from which you can apply for a new Adsense account.


2.To Create a Free Blog (If you don't Have Already)

Now if you don't have any website you first need to build one,you can use Blogger.com to build a professional looking Blog as it is own by Google it has some real good features to attract advertisers.To get started with blogger go to Blogger.com and sign in with your gmail account which you created previously for more detailed information see this 5 Basic Tips To Start Your Blogging Journey In Blogger As Beginner

3.How To Build Traffic To website:

Now after creating your free blog with .blogspot.com domain your main aim should be to work on your blogs content.As content is the main source of getting traffic,to increase your traffic you must adopt the following 
  • You must select correct niche (basically the correct topics).
  • Post at least one post per day,but if you want to increase the traffic at good pace publish 4 to 5 unique posts per day.
  • You must use social networking websites like Facebook,Twitter to promote your Blog.For more detailed information see this Using Social Networking Websites To Boost Traffic
  • You should create unique content to attract audience 

4.Wait For the correct moment:

When you started to receive the traffic at your blog then you must wait for the correct moment to monetize your blog with Adsense.You should only apply for Adsense if your blog reaches the following statistics.

250 Blog Posts with (at least 50 unique posts)
Less then 100,000 Alexa Traffic rank to improve Alexa rank See this
About 15000 Daily Page views with 7000 Unique Visitors 

5.Time To Apply For New Adsense Account

If you are able to touch the above statistics then it is the right time to apply for Adsense account and this time no matter what happens you will be awarded with your very own genuine Adsense account.To Apply for adsense account go to Adsense.com 
  • Fill your correct payee name (Remember it cannot be un done so select it wisely)
  • Fill your remaining personal details
  • Accept Adsense TOS (Term Of Service)
  • And now Apply for a new Adsense account.
Now after a day or 6 to 7 hours you will receive an email from Google Adsense,Congratulating you that you are selected as the publisher of Google Adsense,following is the copy of the email that you will receive


Congratulations!

Your Google AdSense application has been fully approved. Within a few hours you’ll begin to see live ads. If you would like a detailed walkthrough of everything you need to know as a new AdSense publisher, visit the AdSense Academy:  http://support.google.com/adsense/bin/static.py?page=checklist.cs&tab=1187443.

If you wish to access your account, you can visit http://www.google.com/adsense and sign in using the email address and password you submitted with your application. If you've forgotten your password, visit: http://www.google.com/adsense/support/as/bin/static.py?page=ts.cs&ts=1054302&sct=app-api.

IMPORTANT NOTES:

* Please don't click on your ads, even to test them -- doing so isn't permitted by the AdSense program policies: https://www.google.com/adsense/policies.

* Your new account will be closely monitored for compliance with our policies. If policy violations are detected, ad serving to your pages may be stopped or your account disabled.

* You can add the AdSense code to a new page or site that complies with our program policies at any time. There's no need to inform us or apply for a new account when you do.

Sincerely,

The Google AdSense Team

Here are other great resources you might be interested in:
* Help Center: http://support.google.com/adsense
* Help Forum: http://www.google.com/support/forum/p/AdSense
* AdSense blog: http://www.adsense.blogspot.com

-------------------------------------------------------------------------------------------------------------------------------
This message was sent from a notification-only email address that does not accept incoming email. Please do not reply to this message.

Max Payne 1 PC Game Download Free Full Version

System Requirments: Max Payne 1:-))

  • OS::: Windows XP / Windows Vista / Windows Vista
  • Processor::: 700MHz
  • Graphic Card::: 32MB
  • RAM::: 512MB

Max Payne 1 PC Cheats:-))

Note: While Playing Game Press F12 for cheat activation
Effect   www.raishahnawaz.com
Code
Gives All Weapons
GetAllWeapons
Gives Baseball Bat
GetBaseballbat
Gives Beretta
GetBeretta
Gives Bullet Time
GetbulletTime
Gives Colt Commando
GetColtCommando
Gives Dual Berettas
GetBerettadual
Gives Dual Ingrams
GetIngramDual
Gives Grenade
GetGrenade
Gives Health
GetHealth
Gives Infinite Ammo
GetInfiniteAmmo
Gives Ingram
GetIngram
Gives Jackhammer
GetJackhammer
Gives M79
GetM79
Gives Molotov
GetMolotov
Gives MP5
GetMP5
Gives Painkillers
GetPainkillers
Gives Pump Shotgun
GetPumpShotgun
Gives Sawed-Off
GetSawedShotgun
Gives Sniper Rifle
GetSniper
God Mode
God
God Mode Off
Mortal

ScreenShots Of Max Payne 1 Game:-))